Getting Started Guide (Android)
The Harman/Kardon WirelessHD SDK is provided for Android 3rd party developers to communicate with Harman/Kardon Omni Series audio/video devices. The intent of this SDK is to provide the tools and libraries necessary to build, test and deploy the latest audio applications on the Android platform.
Requirements
The HKWirelessHD SDK requires Android 4.1(API 16) minimum for Android devices. The SDK supports both 32bit and 64bit architecture.
Creating a Sample Application
1. Add Jar package and library in your project
Add the libHKWirelessHD.jar package and libHKWirelessHD.so library in your libs folder.
- The step in Android Studio:
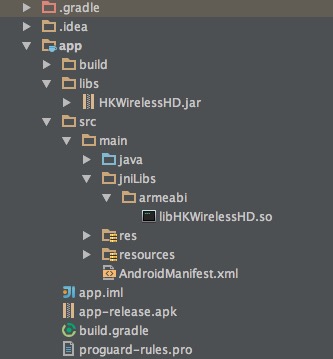
- Copy the HKWirelessHD.jar to app/libs folder and copy the libHKWirelessHD.so to app/src/man/jniLibs/armeabi folder. If the folders don’t exist, please create them.
The directory hierarchy as following:
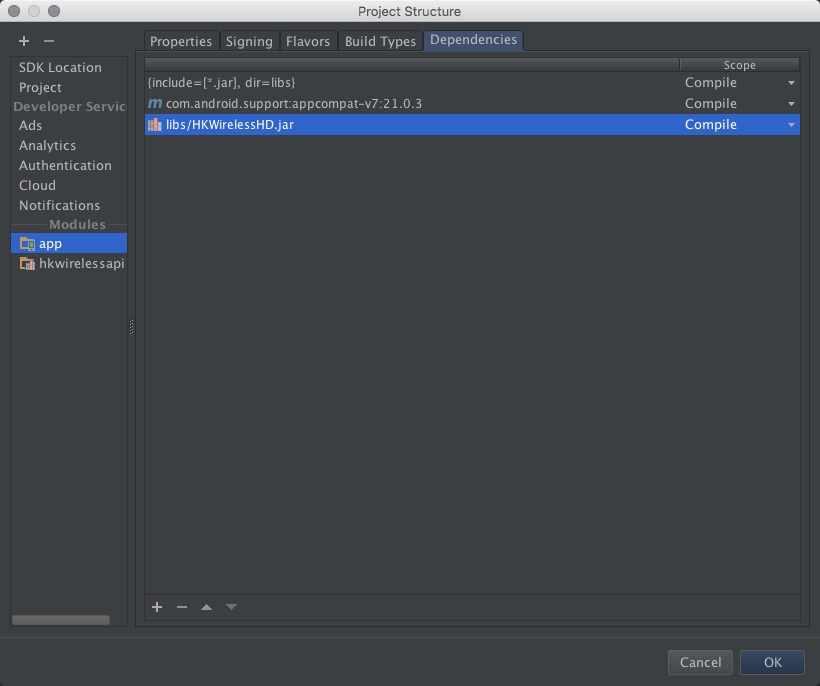
- Add the jar package as library. Select the menu: File->Project Structor->app(under Modules)->Dependencies, push +,then File dependency,select HKWirelessHD.jar. As following:
- The step in Eclipse:
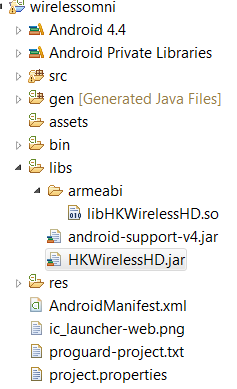
- copy the HKWirelessHD.jar to libs folder and copy the libHKWirelessHD.so to libs/armeabi folder. If the folders don’t exist, please create them.
The directory hierarchy as following:
- Add the jar package as library. Select the menu: Project property->Java Build Path->Libraries select “Add External JARs”,choose the HKWirelessHD.jar.Then add the jar package as external JARs.
2. Add Permission in AndroidManifest.xml file
<uses-permission android:name="android.permission.INTERNET" />
<uses-permission android:name="android.permission.ACCESS_WIFI_STATE"/>
4. Create HKWirelessHD Control Handler and initialize the Wireless Audio
All APIs can be accessed through the object pointer of HKWirelessHandler and AudioCodecHandler. All you have to do is create a HKWirelessHandler object and a AudioCodecHandler object then use them to invoke the APIs you want to use.
// Create a HKWControlHandler instance
HKWirelessHandler hControlHandler = new HKWirelessHandler();

// Initialize the HKWControlHandler and start wireless audio
AudioCodecHandler hAudioControl = new AudioCodecHandler();

@Override
protected void onCreate(Bundle savedInstanceState) {
        super.onCreate(savedInstanceState);
        setContentView(R.layout.activity_main);

        // Initialize the HKWControlHandler and start wireless audio
        hControlHandler.initializeHKWirelessController("...");
}
5. Create application interface
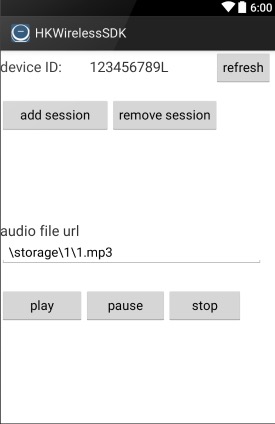
The app is a simple example. Make an activity with some buttons to control the omni device. The interface of app as following:
6. Discovery of the available speakers
To discover and update the status of speakers, you need to refresh the status regularly. The SDK provides a pair of convenient APIs to refresh device status. You can make a button to check the status of devices in the network. For this application, there is only one device in the network.
//refresh device button
  (this.findViewById(R.id.refresh_btn)).setOnClickListener(new View.OnClickListener() {
      @Override
      public void onClick(View v) {
        // start to refresh devices
          hControlHandler.refreshDeviceInfoOnce();
      }
  });
7. Implement callbacks
All the updates from the speaker side are reported to the phone via callbacks. So, if your app needs the latest information of the speakers in certain cases, you should use corresponding callbacks accordingly.
We can get the device ID from onDeviceStateUpdated(). For this application, it is supposed that device ID “123456789” is found in the network.
hControlHandler.registerHKWirelessControllerListener(new HKWirelessListener() {
        @Override
        public void onPlayEnded() {
                Log.d(LOG_TAG, "PlayEnded");
        }

        @Override
        public void onPlaybackStateChanged(int playState) {
                Log.d(LOG_TAG, "PlaybackState :" + playState);
        }

        @Override
        public void onPlaybackTimeChanged(int timeElapsed) {
                Log.d(LOG_TAG, "TimeElapsed :" + timeElapsed);
        }

        @Override
        public void onVolumeLevelChanged(long deviceId, int deviceVolume,int avgVolume) {
                Log.d(LOG_TAG, "DeviceId:" + deviceId + "Volume:"+ deviceVolume);
        }

        @Override
        public void onDeviceStateUpdated(long deviceId, int reason) {
                Log.d(LOG_TAG, "DeviceStateUpdated:" + deviceId);
        }

        @Override
        public void onErrorOccurred(int errorCode, String errorMsg) {
            Log.d(LOG_TAG, "Error:" + errorMsg);
        }
});
8. Find info of speakers and groups
Get DeviceInfo with deviceId
You know the deviceId of a speaker from onDeviceStateUpdated() when new device and group found, then you can get the information of the device using DeviceInfo object.
@Override
public void onDeviceStateUpdated(long deviceId, int reason) {
      // get the number of available speakers
              DeviceObj deviceInfo = hControlHandler.findDeviceFromList(deviceId)
  Log.d(LOG_TAG, "name :" + DeviceInfo.deviceName);
      Log.d(LOG_TAG, "ipAddress :" + DeviceInfo.ipAddress);
      Log.d(LOG_TAG, "volume :" + DeviceInfo.volume);
      Log.d(LOG_TAG, "port :" + DeviceInfo.port);
      Log.d(LOG_TAG, "role :" + DeviceInfo.role);
      Log.d(LOG_TAG, "modelName :" + DeviceInfo.modelName);
      Log.d(LOG_TAG, "zoneName :" + DeviceInfo.zoneName);
      Log.d(LOG_TAG, "active :" + DeviceInfo.active);
      Log.d(LOG_TAG, "version :" + DeviceInfo.version);
      Log.d(LOG_TAG, "wifi :" + DeviceInfo.wifiSignalStrength);
      Log.d(LOG_TAG, "groupID :" + DeviceInfo.groupId);
      Log.d(LOG_TAG, "balance :" + DeviceInfo.balance);
      Log.d(LOG_TAG, "isPlaying :" + DeviceInfo.isPlaying);
      Log.d(LOG_TAG, "channelType :" + DeviceInfo.channelType);
      Log.d(LOG_TAG, "isMaster :" + DeviceInfo.isMaster);
}
And GroupInfo
@Override
public void onDeviceStateUpdated(long deviceId, int reason) {
              //Get the number of groups available in the network
              int groupCount = hControlHandler.getGroupCount();
              Log.d(LOG_TAG, "group cnt :" + groupCount);
      for(int i = 0; i < groupCount; i++){
              // get the each group
    GroupObj group = wireless.getDeviceGroupByIndex(i);
    Log.d(LOG_TAG, group.groupId + " group groupName :" + group.groupName);
    Log.d(LOG_TAG, group.groupId + " group device cnt :" + group.deviceList.length);

    // get the speakers of this group
    for(int j = 0; j < group.deviceList.length; j++){
      DeviceObj obj1 = wireless.getDeviceInfoFromTable(i, j);
      Log.d(LOG_TAG, obj1.deviceId + " obj1 :" + obj1.deviceName);
                              Log.d(LOG_TAG, group.groupId + " group deviceId :" + group.deviceList[j]);
    }
      }
}
9. Add/remove a speaker to/from a playback session
If want to play audio through a speaker, the speaker must be added to the playback session through addDeviceToSession(). And the speaker can be removed from the playback session through removeDeviceFromSession().
We use the device ID that you get from onDeviceStateUpdated().
      //add the speaker to the current playback session from the select list
      (this.findViewById(R.id.add_btn)).setOnClickListener(new View.OnClickListener() {
    @Override
    public void onClick(View v) {
      long deviceId = 123456789L;
      hControlHandler.addDeviceToSession(deviceId)
    }
});

//remove a speaker from the current playback session from the unselect list
(this.findViewById(R.id.remove_btn)).setOnClickListener(new View.OnClickListener() {
  @Override
  public void onClick(View v) {
      long deviceId = 123456789L;
      hControlHandler.removeDeviceFromSession(deviceId)
              }
      });
10. Play an audio file
If one or more speakers are added to the session, then you can start to play a song. Currently, use playCAF() to play mp3, wav, flac, sac, m4a and ogg file, and playWAV only for WAV file, and playStreamingMedia() for http web server.
//Play a audio file from the play list
(this.findViewById(R.id.play_btn)).setOnClickListener(new View.OnClickListener() {
        @Override
        public void onClick(View v) {

                //play a song
                String url = textUrl.getText().toString();
                String songTitle = textName.getText().toString();
                hAudioControl.playCAF(url, songTitle, false)
        }
});

//pause
(this.findViewById(R.id.pause_btn)).setOnClickListener(new View.OnClickListener() {
        @Override
        public void onClick(View v) {
                hAudioControl.stop();
        }
});


//stop
(this.findViewById(R.id.stop_btn)).setOnClickListener(new View.OnClickListener() {
        @Override
        public void onClick(View v) {
                hAudioControl.stop();
        }
});
11. Volume Control
You can set device volume through setVolumeDevice(). This application shows how to control the device volume through phone volume button. The volume level ranges from 0 (mute) to 50 (max).
@Override
public boolean onKeyDown(int keyCode, KeyEvent event) {
        //get device from your select list
        long deviceId = 123456789L;
        DeviceObj deviceInfo = hControlHandler.findDeviceFromList(deviceId)
        int volume =  DeviceInfo.volume;

        switch (keyCode) {
                case KeyEvent.KEYCODE_VOLUME_UP:
                        volume+=5;
                        hAudioControl.setVolumeDevice(deviceId, volume);
                }
                return true;

                case KeyEvent.KEYCODE_VOLUME_DOWN:
                        volume -= 5;
                        hAudioControl.setVolumeDevice(deviceId, volume);
                }
                return true;
        }
        return super.onKeyDown(keyCode, event);
}